A slack adjuster adjusting tool sets the pushrod stroke to 1.5-2 inches for safe braking.
Proper brake adjustment prevents accidents, jackknifing, and DOT violations.
Use the tool only on manual slack adjusters; automatic ones self-adjust.
Clean and inspect your tool regularly to ensure reliable performance.
Measure pushrod stroke at every preventive maintenance check to stay compliant.
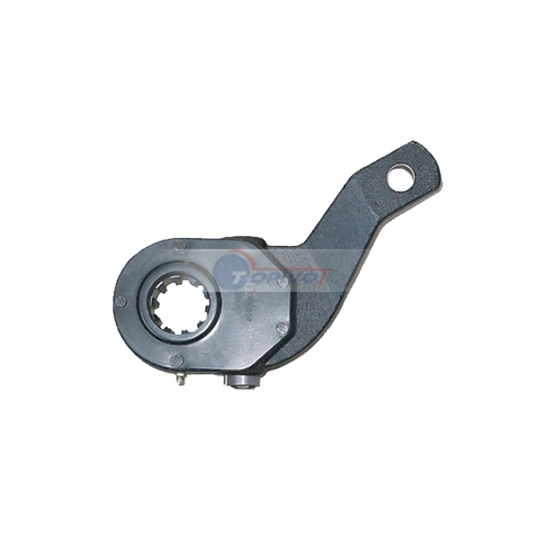
Your air-brake system depends on a precise mechanical sequence. Slack adjusters act as levers connecting the push rod of your brake chamber to the S-cam shaft. When compressed air pushes the rod outward, the slack adjuster rotates the S-cam. That rotation spreads the brake shoes against the drum, converting linear motion into rotational force that stops your vehicle.
The process follows a clear chain:
Your brake chamber pushrod extends linearly when air pressure applies.
A clevis pin connects this pushrod to the slack adjuster.
The pushrod's extension moves the slack adjuster arm.
The slack adjuster, splined to the camshaft, rotates that shaft.
The camshaft turns the S-cam.
The S-cam forces the brake shoes outward against the drum, generating braking force.
Proper adjustment ensures this sequence delivers optimal leverage. When you set the pushrod stroke correctly, your brakes engage faster and more effectively.
Reduced stopping distances result when brakes engage properly.
Manual slack adjusters each require the same fundamental care. You use your Slack Adjuster Adjusting Tool to set them correctly.
Neglecting brake adjustment creates dangerous conditions. Your stopping distance grows, especially when you carry heavy loads. A slack adjuster that sticks or falls out of sync disrupts the entire braking sequence.
Brake imbalance ranks among the most common causes of jackknifing your vehicle.
The consequences of imbalance include:
This instability can lead to a brake-related accident that you could have prevented. Each year, brake problems contribute to a substantial percentage of commercial vehicle accidents. This practice protects your compliance record. DOT inspectors check pushrod stroke during roadside inspections, and violations result in fines and out-of-service orders.
When you understand how slack adjusters function and what happens when they fail, you recognize why this simple tool matters so much. Consistent adjustment keeps your vehicle road-ready. This practice protects your safety and the safety of everyone who shares the highway with you.
The slack adjuster adjusting tool appears simple at first glance, yet its design carries deliberate engineering choices. Most versions feature a 9/16-inch box-end configuration that fits the adjusting nut on manual slack adjusters. This size matches the standard nut found across heavy-duty truck brake systems.
Several design features set quality tools apart:
A 9/16-inch ratchet size that provides secure engagement with the adjusting nut
A deeper hex profile that reaches recessed adjusters on certain chamber configurations
A vinyl grip that resists slipping and protects the ratchet head during forceful turns
The deeper hex matters more than you might expect. Many adjusters sit recessed within the assembly, leaving limited clearance for standard sockets. An extra-deep version reaches those confined spaces without requiring you to disassemble surrounding components.
Handle length directly affects your ability to turn a stubborn adjusting nut. Manufacturers offer different lengths for different situations. The table below shows common variations:
|
Source |
Handle Length |
Drive Size |
Design Feature |
|---|---|---|---|
|
Cornwell RB7578 |
Extra-long |
7/16" |
Overcomes anti-reverse mechanism |
|
Cornwell RB8569 |
Extra-long |
9/16" |
Extra deep hex for recessed adjusters |
|
Apexinds ATCL-7578 |
14.5 inches |
7/16" |
Improved leverage and comfort |
An extra-long handle gives you greater torque without requiring excessive force. This proves essential when you encounter an anti-reverse mechanism that resists backward rotation. The added length also reduces hand fatigue during repeated adjustments across multiple axles.
Selecting the correct tool requires matching its specifications to your specific hardware. Common manual slack adjusters use the standard 9/16-inch adjusting nut, so a quality tool with that drive size serves most applications.
Durability stands as your primary consideration. A professional-grade tool undergoes repeated use in harsh environments where grease, dirt, and moisture accumulate. Look for chrome vanadium steel construction or equivalent alloys that resist bending and cracking under high torque loads.
Grip quality affects both safety and comfort. A vinyl-coated handle provides slip resistance even when your hands carry grease from previous work. This coating also protects the ratchet head from impact damage if you accidentally drop the tool.
Brand reputation matters for professional use. Various manufacturers produce slack adjuster adjusting tools designed specifically for heavy-duty truck maintenance. Their products incorporate the deeper hex profile and reinforced handles that mechanics need for daily use.
Consider purchasing multiple tools with different handle lengths. A compact version serves quick adjustments in accessible locations, while an extra-long version handles stubborn nuts or recessed adjusters. This approach ensures you always have the right tool for the job.
Your investment in this tool remains modest compared to the cost of system failure. Choose wisely, and the tool will serve you reliably for years.
Before you touch any hardware, proper preparation protects you and ensures accurate results. Park the vehicle on a flat, level surface. Place wheel chocks securely under the tires on at least one axle that will not be adjusted. This step prevents the vehicle from rolling when you release the parking brakes.
Follow this sequence to prepare the vehicle safely:
Turn off the engine and confirm the air system is fully charged to at least 90 PSI.
Release the parking brake fully by pushing in the yellow diamond-shaped valve on the dash.
Allow brake drums and hardware to cool down if the vehicle has been driven recently, as they become extremely hot.
Wear gloves and eye protection to avoid contact with brake dust, which may contain hazardous materials.
Never work under a vehicle supported only by a floor jack; use approved jack stands rated for the vehicle weight.
Do not allow a second person to apply the brake pedal while someone has hands near the brake assembly linkage; establish clear communication signals before conducting stroke tests.
The slack adjuster itself sits as a mechanical lever connecting the brake chamber's push rod to the S-cam shaft. You will find it physically attached to the brake chamber, acting as the intermediary that transfers the push rod's force to the S-cam mechanism. On most heavy-duty trucks, you can reach it through the wheel opening without removing the tire.
Once you have located the slack adjuster on the brake chamber, you can begin the adjustment process. Your slack adjuster adjusting tool fits the 9/16-inch adjusting nut on the manual slack adjuster. Common manual slack adjusters use this standard configuration.
Follow these steps to achieve the correct pushrod stroke:
Build air pressure to 90–100 PSI on both primary and secondary gauges, then turn the engine off.
With brakes fully released, mark the pushrod where it exits the brake chamber using chalk, paint marker, or tape. This mark serves as your zero point.
To decrease pushrod stroke, turn the adjusting nut so the S-cam rotates in the same direction as it does during a brake application. This direction mimics the push rod extending out of the brake chamber.
Turn the nut until it feels snug, then back it off slightly to achieve the correct pushrod stroke.
Fully apply and hold the brakes. The pushrod extends from the chamber.
Measure the distance from the reference mark to the new pushrod position while brakes remain held.
Compare your measurement to the regulation stroke limit for your specific chamber type, then repeat at every wheel end.
The verification procedure demands a full brake application at 90 psi. Visual inspection of the slack adjuster position does not meet federal inspection standards. The resulting stroke must fall within the legal limits specified in 49 CFR 393.47, which vary by chamber type and size. If the measured stroke remains above the limit, repeat the adjustment cycle by tightening slightly further and backing off the same increment, then re-measure.
Regular adjustment of your manual slack adjusters ensures consistent braking performance across all wheel positions. Proper adjustments reduce uneven wear and extend the service life of your brake components. When you perform this task correctly, you maintain compliance with federal safety standards and protect everyone on the road.
Your Slack Adjuster Adjusting Tool works in harsh conditions. Grease, road grime, and metal dust accumulate on its surface after each use. This buildup can hide developing damage and interfere with the tool's grip on the adjusting nut. Clean the tool thoroughly after every brake adjustment session.
Wipe the entire tool with a clean, lint-free cloth to remove surface debris. For stubborn buildup, use a solvent-based degreaser and a stiff brush. Pay special attention to the box-end opening where the tool engages the adjusting nut. Dirt packed into this area prevents proper seating and can round off the nut's corners.
Apply a light coat of oil after cleaning. A few drops of general-purpose machine oil on the tool's surface prevents rust formation. Work the oil into the box-end opening and any moving parts if your tool features a ratcheting mechanism. This simple lubrication step extends the tool's service life considerably.
Proper maintenance of your tools directly supports effective preventive maintenance for your vehicle's braking system. A clean, well-lubricated tool allows you to perform precise adjustment procedures without slipping or binding. This accuracy matters when you work on various manual slack adjusters.
Regular inspection of your adjusting tool prevents failures at critical moments. Examine the tool before each use and conduct a more thorough inspection monthly. Look for cracks in the handle, especially near the head where stress concentrates during forceful turns.
Check the box-end opening for signs of stretching or rounding. A worn opening fails to grip the adjusting nut securely, increasing the risk of slipping and damaging the nut. Compare the opening against a new tool or a known-good 9/16-inch socket to detect subtle wear.
Inspect the handle for bending or distortion. A bent handle indicates the tool has experienced excessive force beyond its design limits. This condition weakens the metal and may lead to sudden fracture during future use. Replace any tool that shows visible bending.
Examine vinyl grips or coatings for tears or separation. Damaged grips reduce your control and expose the underlying metal to moisture. Replace the tool if the grip deterioration compromises your hold.
Your inspection routine should also verify the tool's compatibility with your specific hardware. Different slack adjuster models may position the adjusting nut at varying depths. Confirm your tool reaches the nut properly on each vehicle configuration you service.
Replace any tool that fails inspection. The modest cost of a new Slack Adjuster Adjusting Tool outweighs the consequences of a mid-adjustment failure. A broken tool during a brake service creates safety hazards and delays your maintenance schedule. Store your tools in a dry toolbox, separated from heavy components that could cause impact damage. This storage practice, combined with regular cleaning and inspection, keeps your equipment ready for reliable service.
Your slack adjuster adjusting tool ensures manual slack adjusters maintain the correct pushrod stroke within regulatory limits. This adjustment directly impacts braking performance and your safety record. Regular maintenance prevents costly downtime and roadside violations.
DOT regulations require specific compliance checks:
Practice using your tool on various manual slack adjusters. Invest in quality equipment from reputable manufacturers for reliable results. Incorporate routine slack adjuster checks into your safety protocols today. This simple habit prevents accidents, protects lives, and keeps your fleet operating without interruption.
Include manual slack adjusters in your brake inspection. Pushrod stroke must be measured during inspections to comply with federal regulations. Regular checks prevent out-of-service violations.
Your Slack Adjuster Adjusting Tool sets the pushrod stroke to the correct value as specified by regulatory limits. Measure during each inspection. Various manual slack adjusters use this standard.
Check slack adjusters during your post-trip inspections for excessive pushrod movement. Listen for unusual brake sounds. Include a thorough visual inspection at every wheel end.
Scan To Wechat